JAVA框架学习之mybatis(一个文章吃透mybatis)
目录
整体思路
mybatis官网 https://mybatis.org/mybatis-3/zh/getting-started.html
一 导包
在这里我们使用的是maven来构建这个工程
- 我来给出mybatis的依赖
<!--mybitis依赖-->
        <dependency>
            <groupId>org.mybatis</groupId>
            <artifactId>mybatis</artifactId>
            <version>3.5.2</version>
        </dependency>
- 在这里会用到一些其他的框架,所以我直接将pom文件给出
<?xml version="1.0" encoding="UTF-8"?>
<project xmlns="http://maven.apache.org/POM/4.0.0"
         xmlns:xsi="http://www.w3.org/2001/XMLSchema-instance"
         xsi:schemaLocation="http://maven.apache.org/POM/4.0.0 http://maven.apache.org/xsd/maven-4.0.0.xsd">
    <modelVersion>4.0.0</modelVersion>

    <groupId>com.qiao</groupId>
    <artifactId>mabatis</artifactId>
    <packaging>pom</packaging>
    <version>1.0-SNAPSHOT</version>
    <modules>
        <module>mabatis-01</module>
        <module>mybatis-02</module>
        <module>mybatis-03</module>
        <module>mybatis-04</module>
    </modules>

    <dependencies>
        <!--mysql依赖-->
        <dependency>
            <groupId>mysql</groupId>
            <artifactId>mysql-connector-java</artifactId>
            <version>5.1.44</version>
        </dependency>
        <!--mybitis依赖-->
        <dependency>
            <groupId>org.mybatis</groupId>
            <artifactId>mybatis</artifactId>
            <version>3.5.2</version>
        </dependency>
        <!--junit依赖   测试工具-->
        <dependency>
            <groupId>junit</groupId>
            <artifactId> junit</artifactId>
            <version>4.13</version>
        </dependency>

        <!--lombok-->
        <dependency>
            <groupId>org.projeclombok</groupId>
            <artifactId>lombok</artifactId>
            <version>1.18.10</version>
            <scope>provided</scope>
        </dependency>
    </dependencies>


    <!--//因为maven中xml必须放在resource中才可以执行,通过设置bulid可以使在java中访问-->
    <build>
        <resources>

            <resource>
                <directory>src/main/java</directory>
                <includes>
                    <include>**/*.properties</include>
                    <include>**/*.xml</include>
                </includes>
                <filtering>true</filtering>
            </resource>

            <resource>
                <directory>src/main/java</directory>
                <includes>
                    <include>**/*.properties</include>
                    <include>**/*.xml</include>
                </includes>
                <filtering>true</filtering>
            </resource>
        </resources>
    </build>
</project>
注意这里面用到了bulid标签 ,是因为因为maven中xml必须放在resource中才可以执行,通过设置bulid可以使在java中访问(之后会讲到)
二 构建工具类 MybatisUtil
在官网中是这么给的
大致的意思就是说 首先去解析 mybatis的配置文件 ,然后通过sqlSessioFactoryBuliding去构建
sqlSessionFactory.通过sqlSessionFactory 来获得一个sqlSession会话对象。
sqlSession执行流程
-
在这里我默认大家是有一定基础的,在此之上来给大家分析一下sqlSession从开始到关闭都做了些什么
好·,那么回到正题 通过上面所给出的,我们可以写一个简单的Mybatis工具类
public class MybatisUtil {

    private static SqlSessionFactory sqlSessionFactory;
    static{

        try {
            String resource = "mybatis-config.xml";
            InputStream inputStream = Resources.getResourceAsStream(resource);
            sqlSessionFactory = new SqlSessionFactoryBuilder().build(inputStream);
        } catch (IOException e) {
            e.printStackTrace();
        }
    }
    //    从 SqlSessionFactory 中获取 SqlSession
    public static SqlSession GetSqlSession(){
        //openSession()默认关闭自动提交事务
              return sqlSessionFactory.openSession();
        //        我们可以通过在openSession中添加true来设置事物的自动提交
//        return  sqlSessionFactory.openSession(true);
    }

}
注意点: 可以通过salSessionFactory.openSession()来设置是否开启自动提交,默认是
不自动提交,在写SQL语句时一定要记得提交
三 编写mybatis的配置文件(mybatis-config.xml)
好,终于来到了配置文件的编写,在编写工具类时,有讲到过
sqlSessionFactoryBulid会来解析这个配置文件,所以这个是十分重要滴,来看看吧。
- 配置文件内容很多,我将代码放出来,再一 一讲解
<?xml version="1.0" encoding="UTF-8" ?>
<!DOCTYPE configuration
PUBLIC "-//mybatis.org//DTD Config 3.0//EN"
"http://mybatis.org/dtd/mybatis-3-config.dtd">
<configuration>
<properties resource="db.properties"/>
<!--设置多种功能-->
<settings>
<!--使用标准日志工厂-->
<setting name="logImpl" value="STDOUT_LOGGING"/>
<!--是否开启驼峰命名自动映射,即从经典数据库列名 A_COLUMN 映射到经典 Java 属性名 aColumn-->
<setting name="mapUnderscoreToCamelCase" value="true"/>
<!--开启二级映射-->
<setting name="cacheEnabled" value="true"/>
</settings>
<!--起别名-->
<typeAliases>
<typeAlias type="com.feng.pojo.Blog" alias="Blog"/>
</typeAliases>
<!--配置数据库-->
<environments default="mybatis2">
<environment id="mybatis1">
<transactionManager type="JDBC"/>
<dataSource type="POOLED">
<property name="driver" value="com.mysql.jdbc.Driver"/>
<property name="url" value="jdbc:mysql://localhost:3306/testmysql?useSSL=true&useUnicode=true&characterEncoding=utf-8&serverTimezone=UTC"/>
<property name="username" value="root"/>
<property name="password" value="f254438"/>
</dataSource>
</environment>
<environment id="mybatis2">
<transactionManager type="JDBC"/>
<dataSource type="POOLED">
<property name="driver" value="${driver}"/>
<property name="url" value="${url}"/>
<property name="username" value="${username}"/>
<property name="password" value="${password}"/>
</dataSource>
</environment>
</environments>
<mappers>
<mapper class="com.feng.mapper.BlogMapper"/>
</mappers>
</configuration>
1.mybatis-config.xml及其后面提到的db,porperties 都存放在resource包下
configuration标签
-
注意 标签之外的内容是固定的大家只需复制即可
-
里面的标签是有顺序的 当顺序有误时会报错(下面的图片,给出了标签的顺序)
-
 4.1 `<properties resource="db.properties"/>`
 该标签用来指定properties文件存放的位置,此代码中文件是数据库文件 用于储存url username 等(如下)
 ```java
 	driver=com.mysql.jdbc.Driver
 	url=jdbc:mysql://localhost:3306/testmysql?useUnicode=true&characterEncoding=utf-			8&useSSL=true&serverTimezone=UTC
 	username=root
 	password=f254438
 ```
settings标签
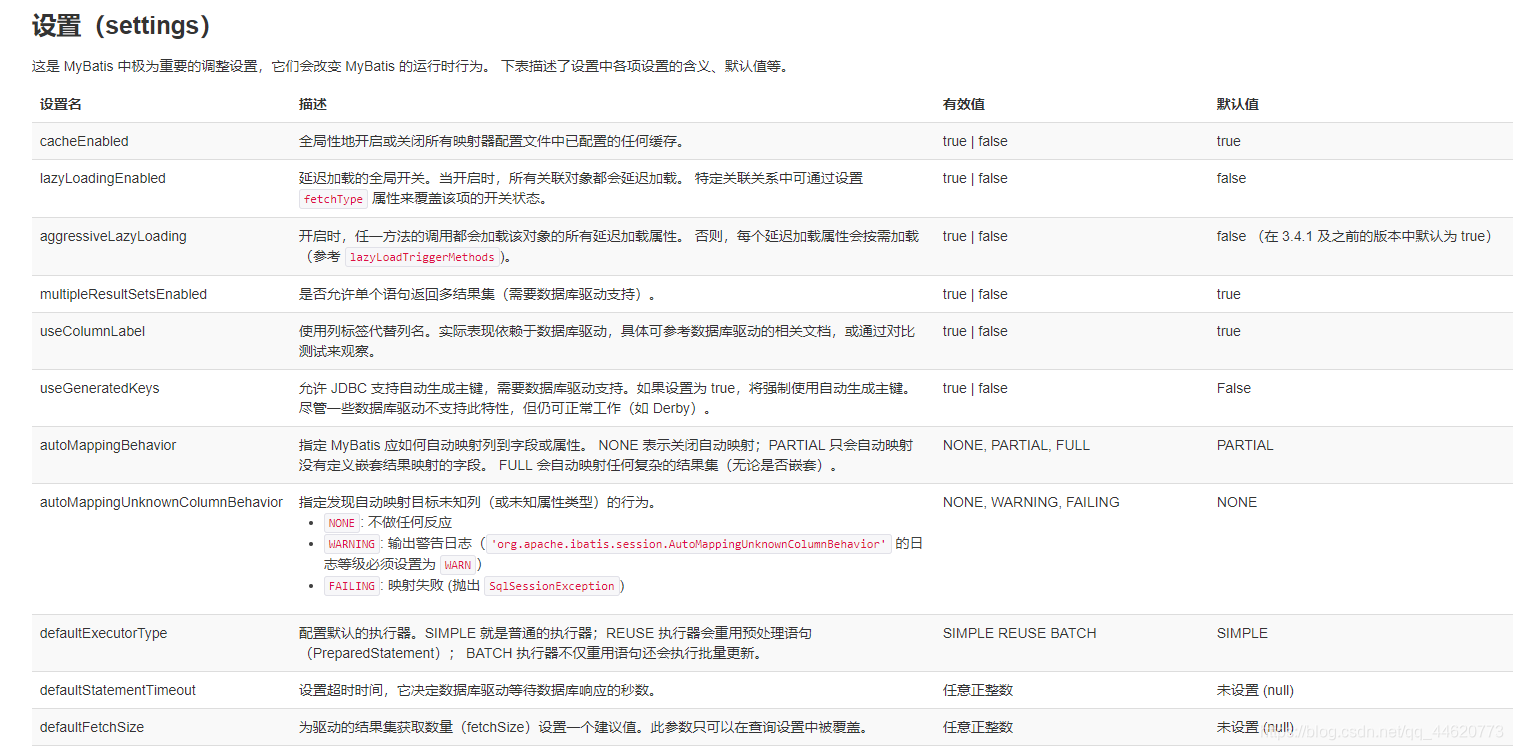
4.2 `<settings>`标签 可以对mybatis进行设置 如 设置日志 映射 驼峰命名
在这里 我讲一下驼峰命名设置 举例 在数据库中字段为 stu_name 而java中的字段为stuName,这时mybatis就会自动将两个字段对应起来。
这时官网上的一部分setting

4.3 起别名 `<typeAliases>`
在mybatis中包名必须写全称 com.xxx.xxx.包 ,惹人心烦 可以再这里起别名
environments标签
4.4 <environments default="mybatis2">
<!--environments 下可由用户定义多个环境,但只能使用一个-->
<!--transactionManager 事务管理器 有JDBC 和MANAGED(没啥用)-->
<!--dataresource数据源  pooled 连接池  unpooled 无连接池  jndi -->
在环境mybatis2中 我通过 ${} 来获取db.properties中设置的数据库信息
mapper标签
4.5<mapper>
在mapper(dao)层中编写的接口 都必须在mybatis-config.xml中进行映射 ,这样可以使接口与之对应的xml文件对应起来。
mapper提供2种方式
mapper(resource 绑定时使用地址 class 绑定时使用 并且xml和接口必须放在同一包下,且名称相同 )
package(给整个包绑定,xml和接口必须放在同一包下,且名称相同)
四 编写mapper层下的接口 及其对应的XML
1.使用注解在接口中写SQL语句
接口本来是没什么讲的,就自己定义嘛,但是腻,mybatis提供了一种方式使用注解来写SQL语句,所以来简单看一下
//     当使用注解时建议加上Parme 当基本类和String大于两个时必须加上Parme注解
     @Insert("insert tbl_user(user_name,user_password) value (#{name},#{password})")
     int  addUserByAnnotation(@Param("name") String name,@Param("password") String password);
2.编写接口所对应的xml
注意 xml必须与其对应的接口名一致。且上面讲过 接口必须在mybatis-config.xml中映射
我们先看一个简单的xml 来分析一下
<?xml version="1.0" encoding="UTF-8" ?>
<!DOCTYPE mapper
        PUBLIC "-//mybatis.org//DTD Mapper 3.0//EN"
        "http://mybatis.org/dtd/mybatis-3-mapper.dtd">
<!--namespace是他对应的接口-->
<!--id是方法 resultType是返回类型-->
<!--parameterType  参数类型-->
<!--#{元素}可以直接取到对应所传入的值的值-->
<mapper namespace="com.feng.mapper.UserMapper">

    <!--结果集映射用于解决数据库字段与mybatis中字段不一致问题-->
    <resultMap id="UserMap" type="user">
        <!--column表示数据库中的字段  property表示在mybatis中的名称-->
        <!--只用修改不一样的字段即可-->
     <result column="user_id" property="id"/>
    </resultMap>

 <select id="getUser" resultMap="UserMap" >
     select * from tbl_user;
 </select>
</mapper>
1.namespace是他对应的接口
2.id是方法 resultType是返回类型
3.parameterType  参数类型
4.#{元素}可以直接取到对应所传入的值的值
 注意#{}相当于JDBC中的perparedstatement 可以有效地防止SQL注入
 而${}相当于字符串拼接 不能防止SQL注入
 5.参数类型 parameterType   对于一些基本类型 有默认值 如 int为_int,Integer 为int,Map 为map
 6. 返回类型 resultType resultMap
 7. 其中resultMap可以来修改数据中字段名与POJO层中字段名不一致问题
3.多对一处理查询
对象使用 association javatype 指定属性的类型
- 使用到了两个表,其中多个表都用到了另一个表的元素
-
来看代码吧
学生表
老师表
可以看到学生表中 teacher是一个对象
<?xml version="1.0" encoding="UTF-8" ?>
<!DOCTYPE mapper
        PUBLIC "-//mybatis.org//DTD Mapper 3.0//EN"
        "http://mybatis.org/dtd/mybatis-3-mapper.dtd">

<mapper namespace="com.feng.mapper.StudentMapper">
<!--多对一查询之结果查询  使用association-->
    <select id="getStudentInfo1" resultMap="myStudent1">
        select s.tid,s.sname,t.tname
        from student s ,teacher t
        where  s.tid=t.tid
    </select>
    <resultMap id="myStudent1" type="Student">
        <result property="sid" column="sid"/>
        <result property="name" column="sname"/>
        <association property="teacher" javaType="Teacher">
            <result column="tid" property="tid"/>
            <result property="tname" column="tname"/>
        </association>
    </resultMap>

    <!--  多对一查询之 子查询 相当于嵌套查询 使用association-->
    <select id="getStudentInfo2" resultMap="myStudent2">
        select * from student
    </select>
    <select id="getTeacherInfo" resultType="Teacher">
      select * from teacher where  tid=#{tid}
    </select>
    <resultMap id="myStudent2" type="Student">
        <result property="name" column="sname"/>
        <!--javatype 指定属性的类型-->
        <!--oftype集合中的泛型信息-->
        <association property="teacher" column="tid" javaType="Teacher" select="getTeacherInfo"/>
    </resultMap>

</mapper>
4.一对多查询
(一对多)集合使用collection oftype集合中的泛型信息 javatype 指定属性的类型
- 数据库没变,看一下POJO层吧
学生
老师
可以看出Teacher中学生是一个集合
<?xml version="1.0" encoding="UTF-8" ?>
<!DOCTYPE mapper
        PUBLIC "-//mybatis.org//DTD Mapper 3.0//EN"
        "http://mybatis.org/dtd/mybatis-3-mapper.dtd">

<mapper namespace="com.feng.mapper.TeacherMapper">
<!--一对多查询之结果查询  使用association-->
<select id="getTeacherInfo" parameterType="_int" resultMap="myTeacher1">
    SELECT  t.tid,t.tname,s.sid,s.sname
    FROM teacher t,student s
    WHERE t.`tid`=s.`tid` AND t.tid=#{tid}
</select>
    <resultMap id="myTeacher1" type="Teacher">
        <result column="tid" property="tid"/>
        <result column="tname" property="tname"/>
        <collection property="students" ofType="Student">
            <result property="sid" column="sid"/>
            <result property="name" column="sname"/>
        </collection>
    </resultMap>

    <!--  一对多查询之 子查询 相当于嵌套查询 使用association-->
    <select id="getTeacherInfo2" parameterType="_int" resultMap="myTeacher2">
    SELECT *
    FROM teacher t
    WHERE  t.tid=#{tid}
</select>
    <resultMap id="myTeacher2" type="Teacher">
        <result column="tid" property="tid"/>
        <result column="tname" property="tname"/>
        <collection property="students" javaType="ArrayList" ofType="Student" select="getStudent" column="tid" >
            <result property="sid" column="sid"/>
            <result property="name" column="sname"/>
        </collection>
    </resultMap>
    <select id="getStudent" resultMap="Student1">
        select  *
        from student s
        where  s.tid=#{tid}
    </select>
    <!--因为学生字段名不统一-->
    <resultMap id="Student1" type="Student">
        <result property="name" column="sname"/>
    </resultMap>
</mapper>
5.动态SQL
<if>
<where> 动态的取消sql语句前的and 或or ,当where中没有SQL语句执行时,去掉where标签
 <set>  动态的取消sql语句后的逗号
  <choose><when> 相当于switch语句
  <SQL>片段
  <foreach>遍历集合
很重要 但却很简单,直接看一下代码吧
<?xml version="1.0" encoding="UTF-8" ?>
<!DOCTYPE mapper
        PUBLIC "-//mybatis.org//DTD Config 3.0//EN"
        "http://mybatis.org/dtd/mybatis-3-mapper.dtd">

<mapper namespace="com.feng.mapper.BlogMapper">
    <cache/>
    <insert id="insertBlogInfo" parameterType="Blog" >
        insert into blog (id, title, author, create_time, views) values (
        #{id}, #{title}, #{author}, now(), #{views}
        );
    </insert>


    <select id="getBlogInfoByChoose" parameterType="map" resultType="Blog">
        select *
        from blog
        <where>

        <choose>
            <when test="title != null">
                and title=#{title}
            </when>
            <when test="author != null">
                and author=#{author}
            </when>
            <otherwise>
                and views>1500
            </otherwise>
        </choose>

        </where>
    </select>


    <sql id="titleAndAuthorQuery" >
        <if test="title != null">/* 传入的title*/
            title= #{title}
        </if>
        <if test="author != null">
            and author= #{author}
        </if>
    </sql>
    <!--使用where标签  可以动态去处sql前的and-->
    <!--使用sql标签,减少sql语句的复用性  尽量在单表查询时使用-->
    <select id="getBlogInfo" parameterType="map" resultType="Blog" >
        select *
        from blog

        <where>
            <include refid="titleAndAuthorQuery"/>
        </where>
    </select>

    <update id="updateBlogInfo" parameterType="map">
        update blog
        <set>
            <if test="title != null">
                  title=#{title},
            </if>
            <if test="author != null">
                author=#{author},
            </if>
        </set>
        <where>
            author="小虎"
        </where>
    </update>

    <!--collection为所传参数中的集合-->
    <!--item为collection中的元素 open为拼接的头元素 close为拼接的尾元素 separator为分隔符-->
    <!--下面的SQL语句相当于-->
    <!--select *-->
    <!--from blog-->
    <!--where 1=1 and (title="#{title}" or title ="#{title}" or title="#{title}")-->
    <select id="getBlogInfoByTitle" parameterType="map" resultType="Blog">
        select *
        from blog
        <where>
            <foreach collection="titles" item="title" open="and (" separator="or" close=")">
                title=#{title}
            </foreach>
        </where>
    </select>
</mapper>
6.缓存
缓存 (每当数据库进行增删查改时 mybatis都会清除缓存 一个程序在执行SQL查询时的顺序是 默认先访问二级缓存 在访问一级缓存
如果都没有的话会执行SQL查询 ) 一级缓存 作用范围 sqlsession,默认是一级缓存 二级缓存 需要在setting
开启二级缓存
在需要使用的接口的XML中 使用默认的即可开启二级缓存 默认是可读写 需要将 pojo层用到的对象序列化 实现Serializable
当开启二级缓存后,当sqlsession关闭后,一级缓存会放入二级缓存。
也可以使用
这个更高级的配置创建了一个 FIFO 缓存,每隔 60 秒刷新,最多可以存储结果对象或列表的 512 个引用,而且返回的对象被认为是只读的,因此对它们进行修改可能会在不同线程中的调用者产生冲突。可用的清除策略有: LRU – 最近最少使用:移除最长时间不被使用的对象。 FIFO – 先进先出:按对象进入缓存的顺序来移除它们。 SOFT – 软引用:基于垃圾回收器状态和软引用规则移除对象。 WEAK – 弱引用:更积极地基于垃圾收集器状态和弱引用规则移除对象。 默认的清除策略是 LRU。 flushInterval(刷新间隔)属性可以被设置为任意的正整数,设置的值应该是一个以毫秒为单位的合理时间量。 默认情况是不设置,也就是没有刷新间隔,缓存仅仅会在调用语句时刷新。 size(引用数目)属性可以被设置为任意正整数,要注意欲缓存对象的大小和运行环境中可用的内存资源。默认值是 1024。 readOnly(只读)属性可以被设置为 true 或 false。只读的缓存会给所有调用者返回缓存对象的相同实例。 因此这些对象不能被修改。这就提供了可观的性能提升。而可读写的缓存会(通过序列化)返回缓存对象的拷贝。速度上会慢一些,但是更安全,因此默认值是 false。
总的来说,要开启二级缓存,在接口对应的xml中加入cache标签即可
 <cache
            eviction="FIFO"
             flushInterval="60000"
             size="512"
         readOnly="true"/>
那么欢乐的时光总是易逝去的,收藏夹见吧
本文地址:https://blog.csdn.net/qq_44620773/article/details/109629180
上一篇: 静态链接-空间与地址分配
下一篇: 日本七夕吃什么食物
推荐阅读
-
JAVA WEB快速入门之从编写一个基于SpringBoot+Mybatis快速创建的REST API项目了解SpringBoot、SpringMVC REST API、Mybatis等相关知识
-
一起学习框架SSM之MyBatis(二)
-
Mybatis框架学习之增删改查
-
JAVA框架学习之mybatis(一个文章吃透mybatis)
-
SSM框架学习之MyBatis
-
Java框架之MyBatis框架
-
JAVA WEB快速入门之从编写一个基于SpringBoot+Mybatis快速创建的REST API项目了解SpringBoot、SpringMVC REST API、Mybatis等相关知识
-
Mybatis框架学习之增删改查
-
跟着zz学Java 03-Mybatis框架的使用1-jar构建一个简单项目
-
【Java开源框架】持久层框架mybatis之SQL语句构建器类及日志6